

First 60 Seconds: Image First SD Card Recovery That Saves Your Files
Most files lost from a logically corrupted SD card can be recovered, provided you stop using the card immediately and create a full image of it before running any recovery software. The main risks are overwriting data through continued use or formatting, and running software on a card that's physically failing. Get those two things right, and your odds are good. Get them wrong, and you can turn a fixable problem into a permanent one.
Key takeaways
- Creating a full sector-by-sector image of the SD card before attempting recovery is essential for avoiding further data loss and allows multiple recovery attempts on a safe copy.
- Imaging software should be used with a dedicated card reader to prevent slower, unreliable connections and ensure a proper clone of the card's raw data.
- Physical damage signs, such as no recognition on any device, visible cracks, or overheating, indicate hardware failure, requiring professional lab recovery rather than DIY software methods.
- Recovery success rates are higher for simple logical issues with properly imaged cards, but large or fragmented files like videos may recover with lower integrity and require extra verification.
- Free recovery tools pose risks, so prioritize those with preview capabilities, imaging support, offline operation, and clear privacy policies, especially for irreplaceable or sensitive data.
Table of Contents
- SD card recovery: what to do right now (and what never to do)
- How to recover data from an SD card, step by step
- Choosing SD card recovery software without getting burned
- When DIY recovery won't work: physical damage warning signs
- PC Scientist's approach to SD card recovery cases
- A note on what these files usually mean
- Getting professional help with SD card recovery
- Sources
- FAQ
SD card recovery: what to do right now (and what never to do)
The first sixty seconds after you notice missing or corrupted files matter more than anything you do afterwards. Every extra photo you take, every file you save, every time you let the camera or phone "fix" the card, you're writing new data over the old data you're trying to save.
Here's the checklist we'd want you to follow before you touch anything else:
- Eject the card properly and stop using it. No more photos, no more file transfers, nothing. Every write operation is a chance to overwrite the exact data you want back.
- Pull the card and use a dedicated USB card reader on a healthy computer. Camera-to-computer cables and in-camera USB modes are slower and less reliable for recovery work than a proper card reader.
- Never format the card, even if your device begs you to. A quick format usually just clears the file index and leaves the underlying data intact, but a full or secure format overwrites the sectors and makes recovery close to impossible.
- Set up a separate destination drive before you start. You need somewhere other than the SD card itself to save an image and, later, your recovered files.
Pro Tip: If your camera or phone shows a "format this card?" prompt the moment you insert it, don't tap "format" out of habit. That message usually means the file system is unreadable, not that the data is gone. It's exactly the scenario where imaging first gives you a second, third, and fourth attempt at recovery.
How to recover data from an SD card, step by step
The workflow professionals use isn't complicated, but the order matters. Skip the imaging step and you lose your safety net. Get the order right and you can attempt recovery as many times as you need, on a completely separate file, without ever risking the original card again.
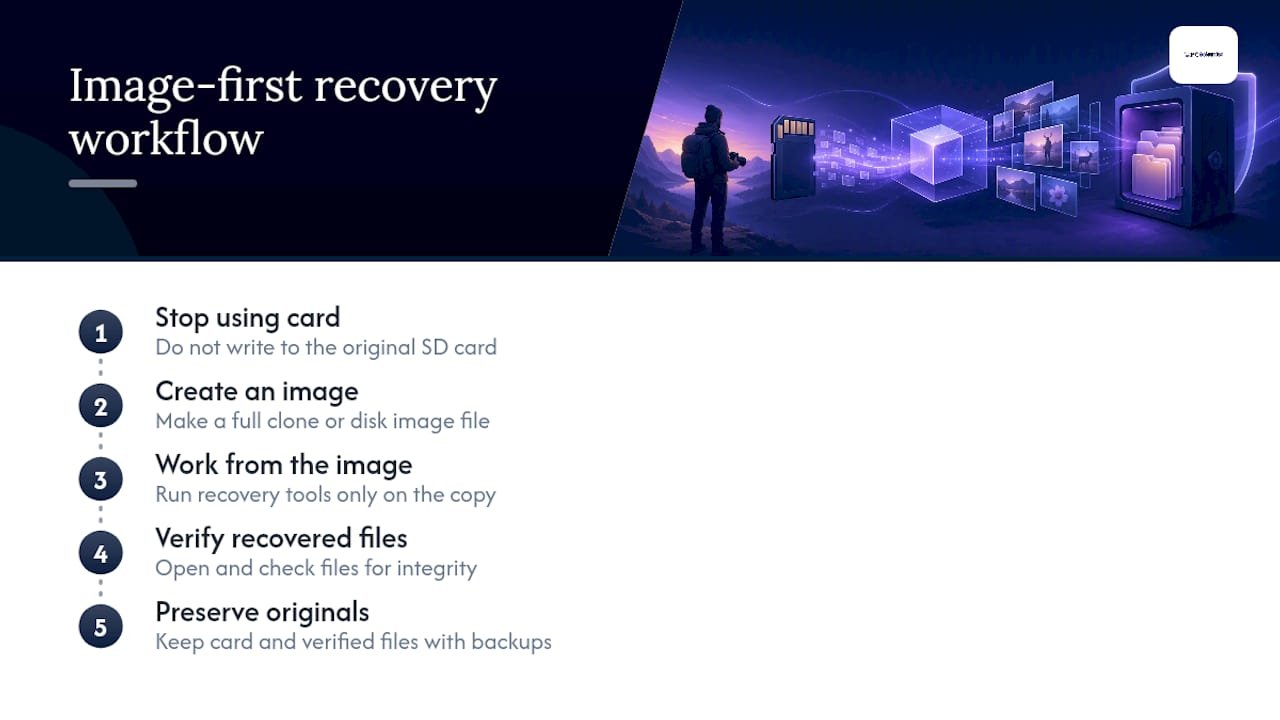
Why you image the card before you do anything else
A disk image is a sector-by-sector copy of the entire card, every byte, including the deleted files and file fragments your operating system can't normally see. Formatting is usually a logical operation that clears file-system references but leaves the raw data sitting on the card, which is exactly why imaging works. Once you've got that image saved as a file (commonly a .img, .dd, or .iso file, depending on the imaging tool), you can run recovery attempts against the copy indefinitely, without touching the original card again.
The actual steps
- Connect the SD card via a dedicated card reader, not a phone or camera plugged in directly.
- Run imaging software to create a full, sector-by-sector clone of the card, saved to your separate destination drive, never back onto the card itself.
- Point your recovery software at the image file, not the original card. Most reputable recovery tools let you select an image file as the source, which is exactly the workflow professional-grade recovery setups recommend.
- Run a quick scan first. This checks the existing (or recently deleted) file index and is fast, often the right call for a simple "I deleted a folder by accident" scenario.
- If the quick scan comes up short, run a deep scan. Deep scans work sector-by-sector and are what actually finds data on reformatted or RAW cards that quick scans miss entirely, though they take considerably longer.
- Preview before you recover anything. A good tool lets you open thumbnails or file previews before committing to a save, so you're not guessing whether a file is intact.
- Save recovered files to your separate destination drive, never back to the SD card. Writing recovered files onto the card you're recovering from can overwrite the very data you haven't recovered yet.
- Open a sample of recovered files to check they play, open, or display properly, and keep at least two copies of anything irreplaceable once you've confirmed it's intact.
The gap between quick and deep scans is the difference most people don't understand until they've lost something. A quick scan reads what's left of the file table and is genuinely fast, useful when you've simply deleted something and haven't written anything new. A deep scan ignores the file table entirely and reconstructs files from raw data patterns, which is slower but is the only method that works once the file system itself has gone RAW or corrupted.
Statistic Callout: Independent hands-on testing shows that for straightforward logical failures, accidental deletion, or a quick format, recovery success rates can be high when the imaging-first workflow is followed. Large or fragmented files, particularly video, tend to come back with lower integrity than photos or documents, so treat a recovered video file with more caution and check it plays properly before you delete anything.
Verification matters more than people give it credit for. A file that "recovers" isn't automatically a file that works. Open photos to check they're not half-grey or corrupted mid-frame. Play video files right through, not just the first few seconds. Open documents and spreadsheets to confirm the content matches what you remember. Only once you've verified a batch should you consider the recovery finished, and even then, copy that verified batch somewhere else too. Recovered data deserves the same backup discipline as data you never lost.
Choosing SD card recovery software without getting burned
Not all recovery tools are built the same way, and the "free" label is doing a lot of heavy lifting in the SD card recovery space that it probably shouldn't.
Before you install anything, check for these things:
- Preview-before-you-pay. A tool that shows you which files it can recover, with working thumbnails, before asking for payment is a good sign. If it can't show you anything until after you've paid, that's a red flag, not a feature.
- Support for imaging, or at least the ability to point recovery at an image file rather than the live card. This is the single biggest differentiator between a tool built for careful recovery and one built for quick wins.
- Offline operation. Recovery software that needs a constant internet connection to function raises questions about what it's doing with your files in the background.
- A clear, readable privacy policy. If you can't find one, or it's vague about what happens to scanned file data, treat that as a warning sign given you're often scanning genuinely private photos and documents.
Statistic Callout: Free recovery tools carry real risks, bundled adware, unclear write behaviour, and in some cases, malware disguised as a recovery utility. Open-source options exist and can work well, but they generally demand more technical skill and still need to be run against a disk image rather than the live card to be used safely.
Before installing any recovery software, download it only from the vendor's own site, never a mirror or a "download portal" that's aggregated a dozen tools together. Scan the installer with your existing antivirus before running it, and decline any bundled toolbar, browser extension, or "recommended software" that piggybacks on the install. These bundled installers are one of the most common ways people end up with far more problems than the one they started with.
As a rough guide: free tools tend to handle simple accidental deletions reasonably well, but they often lack imaging support and preview features, which is exactly where the risk creeps in. Paid tools generally build in imaging, deeper scan modes, and proper preview functions, which is why independent reviews rate imaging support and preview quality above the free-versus-paid label when judging whether a tool is actually safe to trust with irreplaceable files.
When DIY recovery won't work: physical damage warning signs
Software can only fix problems that software can see, and a physically damaged card is a different problem altogether. If you're seeing any of the following, stop attempting DIY recovery straight away:
- The card doesn't show up on any computer, reader, or device, not even as an unformatted or unrecognised drive.
- Visible physical damage, cracks, bent contacts, a card that's been through water or a wash cycle.
- The card gets noticeably warm or hot when connected, even briefly.
- Repeated disconnects and reconnects in Windows or macOS, where the card appears, drops out, then reappears moments later.
Running recovery software on a card in this state doesn't just fail quietly. It can actively worsen the damage, because every read attempt on a failing chip is another stress cycle it may not survive. Software recovery relies on the card being readable at a hardware level, if the flash memory chip itself, the controller, or the physical contacts have failed, no amount of scanning will get past that.
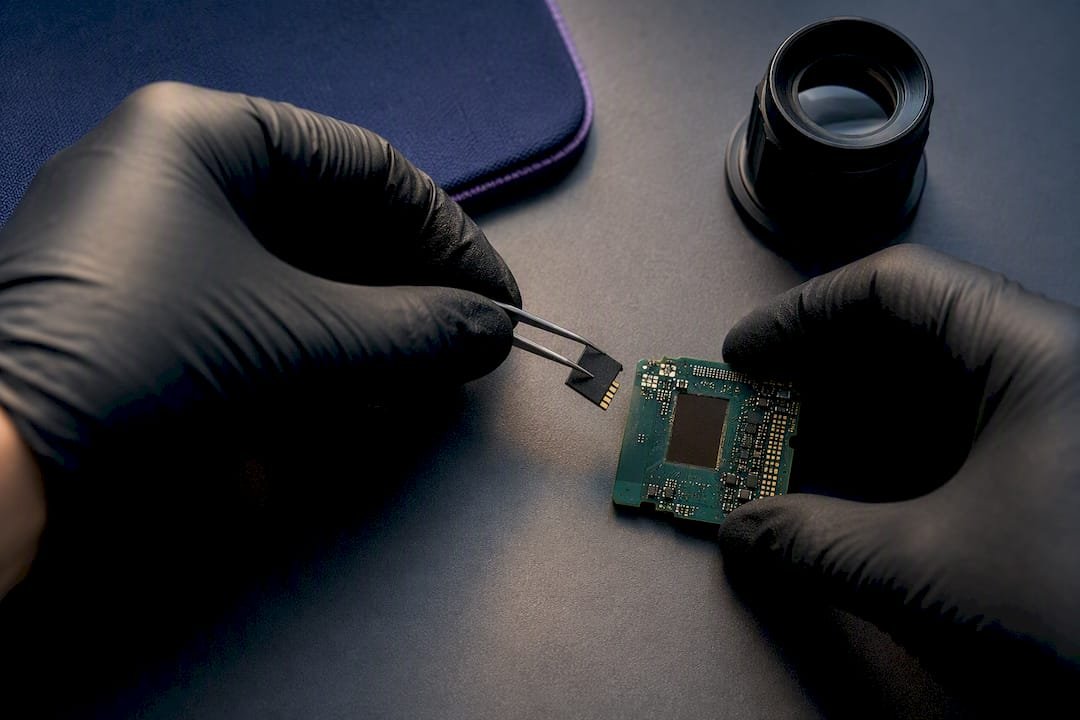
This is where a lab step in, using techniques software simply can't replicate: controller-level diagnostics, circuit-board repair, and in the most severe cases, chip-off recovery, physically removing the memory chip and reading it directly. It's specialised work, and it's priced and timed accordingly, often taking days rather than the hours a software recovery might. But for a card that's genuinely dead at the hardware level, it's often the only path back to the data at all.
PC Scientist's approach to SD card recovery cases
We treat every SD card that comes through our door the same way: assume the data matters and handle it accordingly. That starts with an image-first policy on every job, we never run recovery attempts directly against a client's original card. We clone it first, then work exclusively from that copy, so the original stays untouched no matter how many recovery passes we need to try.
If initial testing on the image shows the card is logically damaged, corrupted file system, accidental format, deleted files, we work through quick and deep scans on that copy and verify what comes back before handing it over. If our triage shows signs of physical failure instead, we're upfront about it straight away rather than continuing to run software against a card that's only going to get worse. That's when we talk through lab escalation options and what a realistic timeline and cost looks like for that specific card.
Client confidentiality carries the same weight in a recovery job as in any of our other work. If you're bringing us a card, the most useful thing you can do beforehand is stop using it immediately and, if you can, note down roughly what you're expecting to find and when the problem started. That context alone can shave real time off diagnosis.
A note on what these files usually mean
Behind almost every SD card recovery request, we've noticed there's something more than "just files." It's a wedding gallery, a kid's first years, footage from a job site that a business genuinely needs. That emotional weight is real, and it's part of why we take the image-first approach so seriously, because a rushed attempt on the original card can turn a recoverable situation into an unrecoverable one.
If you've followed the steps in this guide and you've got files back, take the win, but don't stop there. Copy those recovered files to multiple separate locations before considering the recovery fully complete. The card that failed you once can fail again, and recovered data that only exists in one place isn't really safe yet.
- PC Scientist
Getting professional help with SD card recovery
If you've worked through the imaging and scanning steps and you're still missing files, or you're seeing any of the physical damage signs we've covered, it's time to bring in a professional rather than keep testing your luck. PC Scientist runs data recovery triage the same image-first way described in this guide, we clone the card before we touch it, test on the copy, and only escalate to lab-level work when the situation genuinely calls for it.

Our Data Recovery Scientist service covers exactly this kind of case, from straightforward corrupted-card triage through to escalation for cards showing signs of hardware failure. We handle every card with the same confidentiality we'd want for our own family photos or business files, and we're upfront the moment we know whether recovery looks realistic or not. If you need professional help with SD card recovery, get in touch through our data recovery page to book a triage and find out where your card actually stands.
Sources
- Your Guide to SD Card Data Recovery in Perth
- EaseUS Data Recovery Wizard review: safety, performance and whether it's worth paying for
- Is Free SD Card Data Recovery Software Safe to Use?
Recommended
- NAS data recovery: practical steps and when to call a pro
- Laptop won't turn on? Here's what to check first
Frequently Asked Questions
Straight answers about First 60 Seconds: Image First SD Card Recovery That Saves Your Files - without jargon or pressure. Call 0493 563 381 for advice, or get help below.
Want the quickest answer? 0493 563 381 for free advice.
Stop using the card immediately, create a full sector-by-sector image of it, then run quick and deep scans against that image rather than the original card, saving anything recovered to a separate drive.
Software-based recovery for simple logical damage generally costs far less than professional lab work, while physically damaged cards requiring circuit repair or chip-off recovery cost more and take longer, often several days rather than hours.
There's no single best free tool, since free options carry real risks like bundled adware and unclear write behaviour, so prioritise imaging support and a genuine preview feature over the "free" label alone.
If the card shows as RAW or prompts you to format, don't format it, image the card first, since formatting usually only clears the file index rather than erasing the data, then run recovery against that image.
Data recovery across NSW
Still stuck recovering an SD card?
If files have gone missing, that is okay. Get data recovery help in your area and we will take it from here.
Start here
Get data recovery help
Optional Need a Sydney city or region?
Choose a side of Sydney
These are Sydney cities and regions, such as the Northern Beaches or Inner West. First tap a side of Sydney. Then open the city or region that covers you.
C Sydney City / Inner 3 areas
N Northern Sydney 6 areas
NW North-West / Central Sydney 3 areas
W Western Sydney 1 area
SW South-West Sydney 3 areas
S Southern Sydney 2 areas
Optional Find your suburb
Type a suburb from our listed coverage. This opens the matching city or region page for this topic. Listed suburb pages are general technology services, not this specialist page.
If your suburb is not listed, use the city or region list above, or call 0493 563 381.
Disclaimer
The information in this article is provided for general educational and informational purposes only. While PC Scientist strives to keep all content accurate and up to date, technology issues can vary depending on your device, software, network configuration, and individual circumstances. Always back up important data before attempting repairs or system changes. If you are unsure or the issue cannot be resolved safely, contact PC Scientist today for professional onsite or remote IT support. PC Scientist is not liable for any loss of data, damage, or other issues resulting from the use of the information provided in this article.